


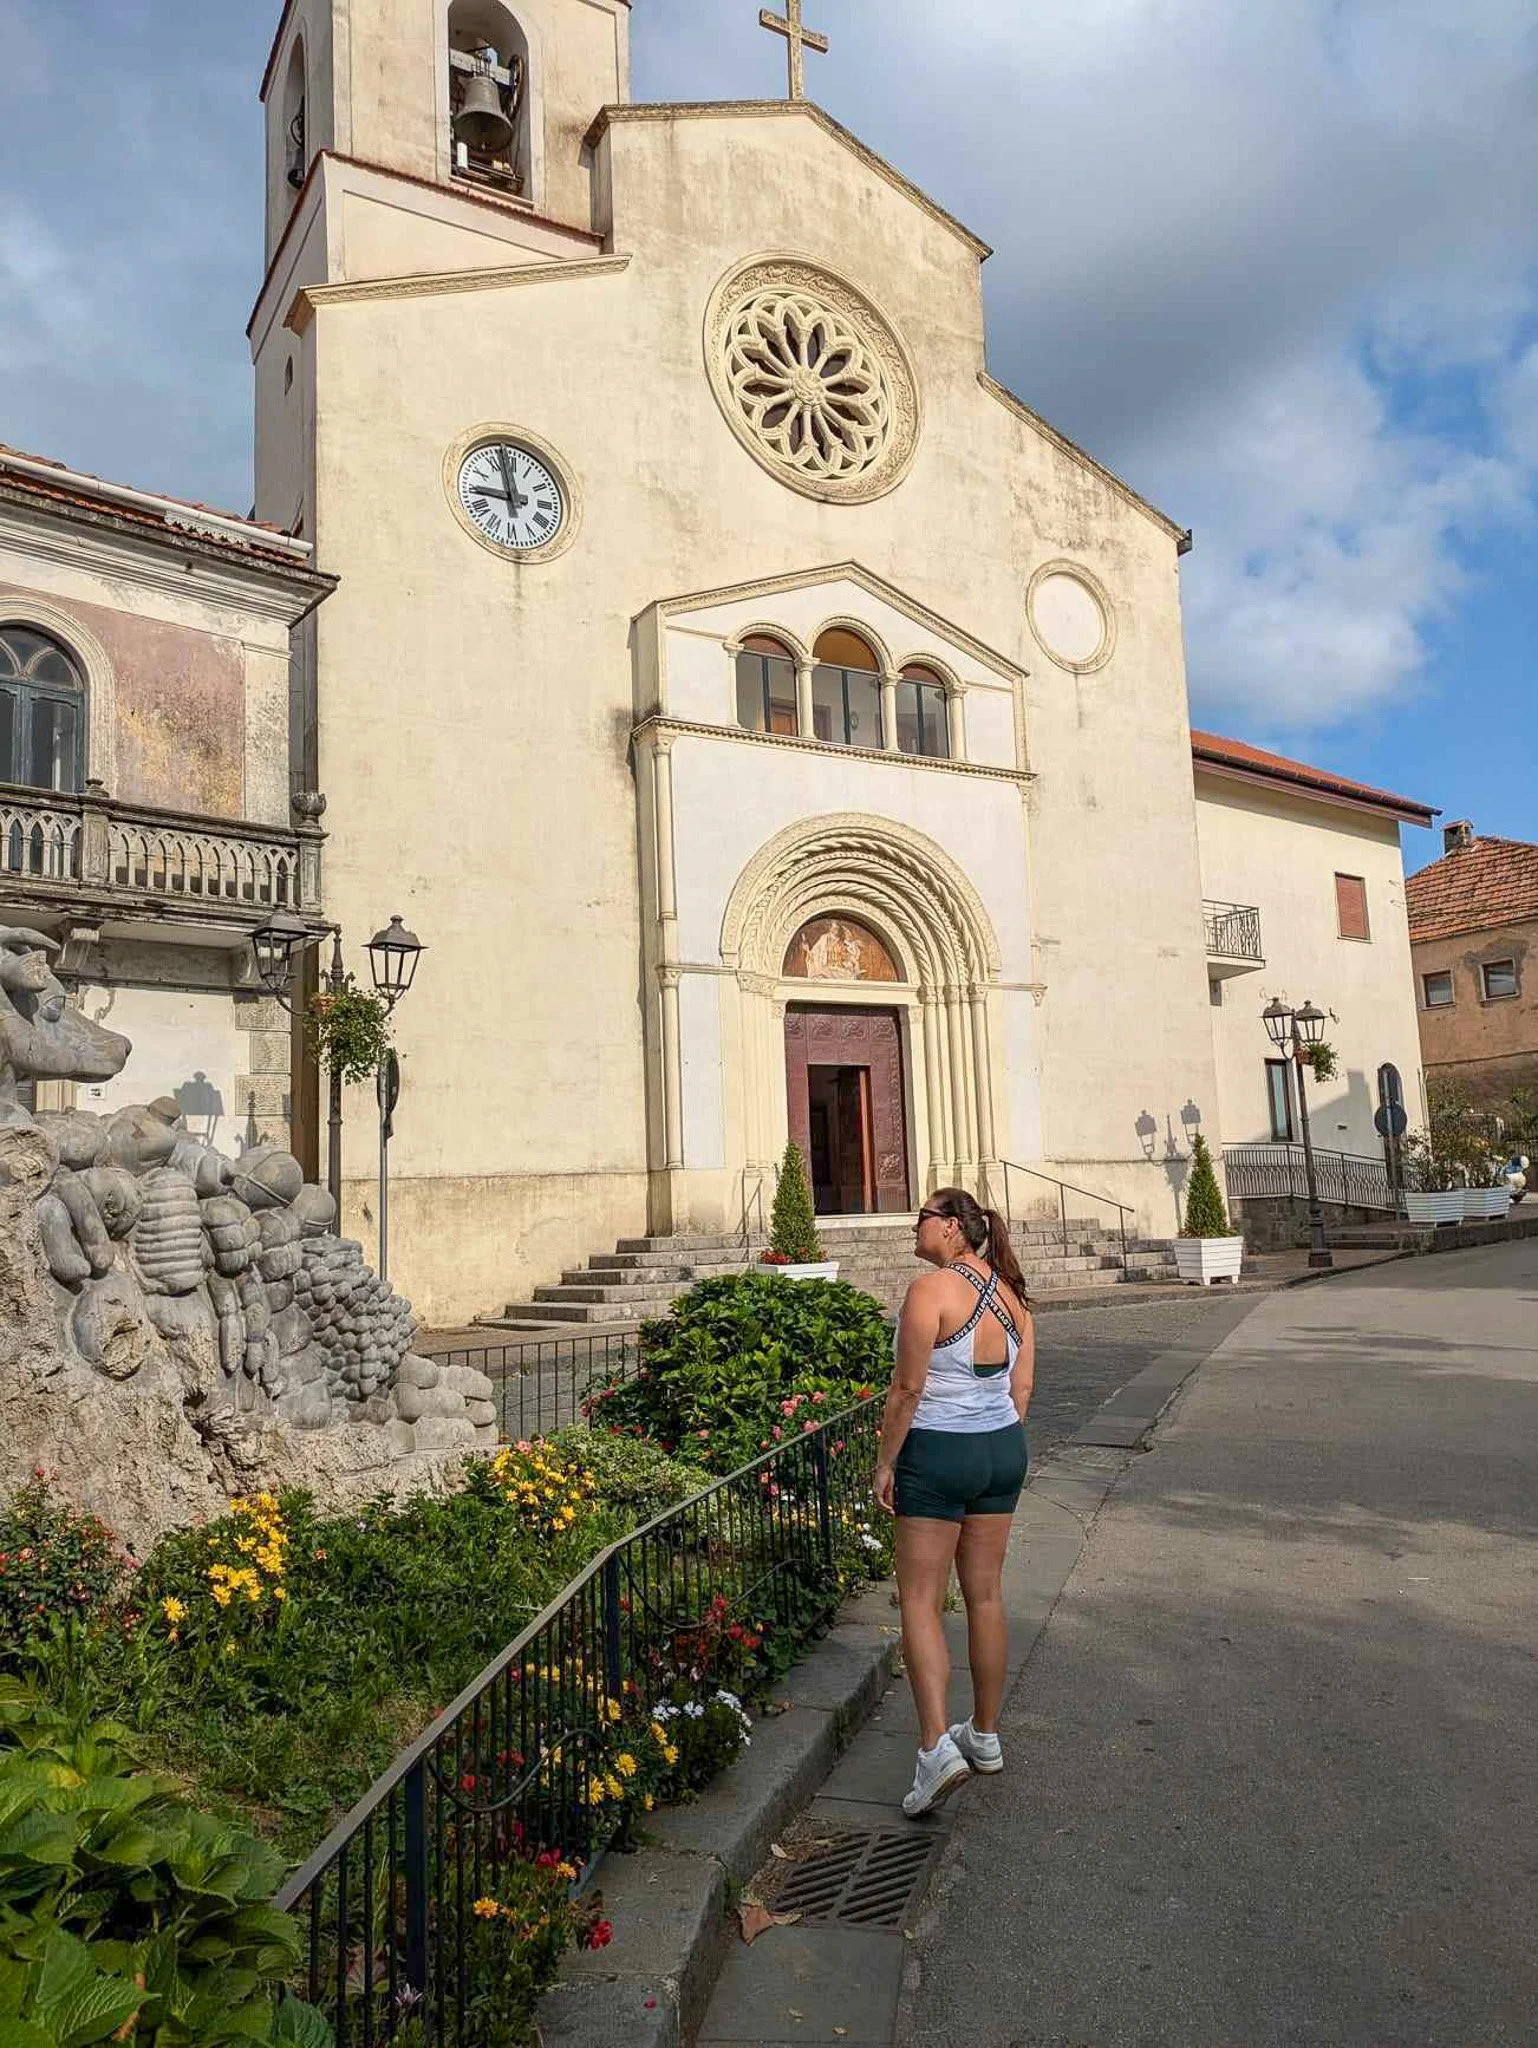
Traversing the breathtaking Path of the Gods
The Amalfi Coast in Italy is stunning from any angle but hiking along the clifftops of the Sentiero degli Dei (the Path of the Gods) offers up unbeatable views.
The official path runs from the small mountain-top town of Bomerano and finishes in Nocelle but you can continue (as we did) down the 1700+ stairs to end up 500 metres below in bustling Positano. Just prepare your legs for that finish!
It is recommended to do the hike in this direction to make the most of the views but also as this way has less uphill so is a little easier on the legs.
Appreciating Bomerano
This has to be one of the most beautiful walks but honestly, it is probably not for the faint of heart in the Italian summer heat and there is some up and down as you hike along.

Spectacular views along the way
We did this hike in August 2024, and it was HOT. We caught one of the first morning buses from Amalfi town to take us the 40 minutes up the winding mountain roads to do as much of the hike before it got too hot.
The only catch with this early bus is that we did have to hunt to find a place that sold bus tickets at that time, we ended up finding a café in Amalfi that sold them but only if we grabbed an espresso as well – cash only too for those that are wondering.
The bus dropped us near the main piazza of Bomerano and we grabbed a mozzarella roll and another espresso to fuel us for the walk ahead.

Breakfast in Bomerano
You walk out of town a little to the official start of the trail. From there, the trail is easy to follow—look out for the red and white lines that mark it along the way. Follow signs for Sentiero degli Dei, trail #327 and after about 800m you will be at the official entry to the hike.

The official start of the Path of the Gods
We had a day of bright sunshine and there isn’t too much shade along the way. I was grateful we had packed loads of water and sunscreen with us for the morning out.
The trail itself is a mix of graded dirt and gravel trails, up and down large stone steps, and over rockier, uneven trails – we were passed by a herd of goats that are clearly more accustomed to this kind of terrain!

The path is right on the edge
About two kilometres in, there is a fork in the road, an option for those that are truly afraid of heights to take a slightly different path to Nocelle. The main cliff path with the spectacular scenery is #327, and #327a will take you on a less exposed path.

Epic views
This is where the trail really delivers the views. We really took our time over the next couple of kilometres, soaking up the Amalfi Coast vistas. The dramatic peninsula seems to stretch forever in the distance.
Alongside the breathtaking clifftop, we passed by terraced farms, lush vineyards, and fields of wheat.
Along the way, there are a couple of water points and picnic benches were excellent places to stop for a breather and enjoy the views. We actually stopped at what felt like just after half way for a frozen lemon drink at what looked like a shack on the edge of the cliff. I later discovered that this eclectic construction is called Ulisee’s House and was perfect for cooling off a little in the shade.

Inviting us in for a cold drink…
As we got close to Nocelle, we could even see the Island of Capri in the distance.
Nocelle is a tiny village but we stopped at a little restaurant/bar as we entered the town that offered incredible views. A couple of cold beers at Il Chiosco del Sentiero Degli Dei were just what we needed before tackling all the stairs to Positano.

A beer with a view in Nocelle
Thankfully the views on the way down are worth the burning quads but I did have to stop a few times to take a little break.

Directions are easy to find
Once you reach the bottom of the stairs, you actually have to walk along a part of the winding road to get to Positano. I probably found this the most stressful as there is no footpath and the road seems barely wide enough for one car!

Some of the stairs down to Positano
After a day of seeing very few people, the teeming masses as we encountered as we walked in to Positano was a little overwhelming. We stopped at a restaurant along the way to grab a bite to eat and another cold drink. I couldn’t even tell you the name.
We wandered around for a little bit before deciding we needed to head back to our quieter side of the coast. This meant again braving masses of people to find the right ferry to take us back to Amalfi town where we jumped in for a swim before walking back through the pedestrian tunnel to Atrani.

Positano
In my opinion, the Path of the Gods is definitely worth hiking. It’s a beautiful trail that gives you a different perspective on the stunning Amalfi coastline, and if you start early, it’s also a peaceful escape from the crowds that seem to be everywhere in the busy summer season.
The stats:
From Bomerano to Nocelle, it is about 6.5km and should take about two to three hours.
If you are adding the steps down to Positano, allow at least an extra half an hour to an hour as the elevation drops from 450m to 80m.
Total Ascent: 235 metres
Total Descent: 780 metres
Highest Elevation: 650 metres
Lowest Elevation: 80 metres

Making it to the Cradle Mountain Summit... almost
Sometimes you look at a mountain or hike and think it won’t be that hard. At other times, it is harder than it looks. Summiting Cradle Mountain in Lake St Clair National Park is definitely the latter.
The thing is, it shouldn’t have come as a surprise. Everyone says this isn’t an easy summit, and even the woman who sold us our registration passes reinforced the ‘this is a tough summit’ message.
The good news is, you don’t have to complete a full summit to appreciate the hike in and around Cradle Mountain as the changing landscapes in this part of Tasmania and incredible vistas enroute mean you don’t have to go all the way to the top.

Views from Marion’s Lookout
There is one than one route to the top and with the added benefit of shuttle buses that move around every 15 minutes, you don’t need to start and finish at the same point. In my opinion, any hike that has minimal backtracking is a win!
The day we set out was a little cloudy, but as we ascended, we had bits of sunshine, but a lot of wind…
We started out early but just parked in the main car park and used the shuttle bus to get to the starting point of our choice. We decided to head off from Ronny Creek and finish at Dove Lake in the afternoon. This is a slightly longer route but provides more different landscapes along the way and considering I am definitely looking for the journey AND the destination, this seemed the way to go.

Lush and green at Ronny Creek
This route took us up to Crater Lake, Marion’s Lookout and Kitchen Hut before Summit, then down via Wombat Pool, Lake Lilla and finishing with some epic views from Dove Lake before grabbing a shuttle back to the main carpark (and a well-deserved wine at Cradle Mountain Lodge).
The hike started out easily enough after signing in at Ronny Creek (safety first of course) with gentle boardwalks surrounded by small creeks and native bushland. If you come back here at dusk, you will find this area lousy with wombats!

A waterfall on the way!
The scenery then changes as the elevation increases. There are a couple of small waterfalls and dense forest – the temperature is noticeably cooler in this section.
Soon after this section, you get to Crater Lake, marked by a cute little boat shed. The lake is immense and you get a reprieve from climbing until you reach the other side – then you start the UP to Marion’s Lookout.

Crater Lake
This section of the trail is steep and you will have to do some rock scrambling. There is a chain in sections to help you get up the bigger steps – very handy for those of us with shorter legs and not to mention those we met attempting The Overland Trail with giant packs as this is where the trails intersect.
Working up that sweat is all worth is for one of the best views of the day – panoramic vistas over Dove Lake on one side and Cradle Mountain peak on the other.

Views and lakes at every turn.
From here, we headed towards Kitchen Hut. This was a relatively cruisy walk with flatter sections and boardwalks but it was exposed to the elements and the cold wind was seeping through my layers. As we walked on, Cradle Mountain was at times completely enclosed in cloud – and simultaneously seemed very far away…

Looking for the Summit Trail…
Kitchen Hut is a spot for emergencies and not somewhere you can stay, but we sought a break from the chilly wind and ate our packed lunches inside. This is also the only bathroom on the trail so make the most of it (I would recommend BYO toilet paper in busy seasons).

Kitchen Hut
This is where the summit to Cradle Mountain proper really starts and just looking at it from here, you can see how steep the section is going to be.
After about 20mins of rocky incline you reach the point where it is all-rock scrambling. I am talking big, sometimes wobbly, sometimes jagged rocks with limited trail markers on white poles as you make your way up. You need hands and feet to scramble up here.

Starting the steep Summit
It was a little over half-way through this rock-scrambling – close to what is referred to as the false peak - and with shaking legs that I decided to take a break and decide if I had it in me to make it to the top. Thankfully my wonderful hiking partner didn’t hate me for deciding I didn’t.
In good weather conditions, I would say that the Cradle Mountain summit walk is definitely worth it. I have heard the 360-degree views are incredible, but we were in the clouds, with high winds and low visibility. We probably turned around not far from the top, but I had to choose safety over ticking a summit off the list.

The Summit ‘trail’
We headed back down to Marion’s Lookout (the only backtracking we did all day) and then turned off at Crater Lake to go down towards the Wombat Pool and Lake Lilla. This section of the trail was busier than any others and I have seen that a lot of people do the hike both from and returning to Dove Lake.

A slow descent
Walking along here, past Wombat Lookout, it is easy to see why it is referred to as the scenic route down some steep steps from the Wombat Pool to Lake Lilla.
From Lake Lilla, there are a few steps down but it is mostly flat and about 20mins before you reach Dove Lake. Time for the legs to begin rejoicing.
One of the last stops before you get to rest your legs is Dove Lake Boatshed – arguably the most famous photographed location in all of Cradle Mountain.

Dove Lake Boatshed
All up it took us a bit over eight hours to get to Dove Lake – not including our paddling time at the lake to refresh our feet in the icy waters. What an epic day and maybe one day I will go back and try the Summit again… but if I don’t, i still have incredible memories of this stunning part of Australia.

Freezing but refreshing for tired feet at Dove Lake.

8 things you must experience at Carnarvon Gorge
If you are looking for a place the literally feels out of this world, Carnarvon Gorge is it.
Carnarvon Gorge is truly a spectacular place, and you need more than a couple of days to truly take in all the beauty and appreciate the ancient landscapes.
In the gorge, the “bush” of Australia’s arid interior meets the lush jungle of the wet coastal tropics – a mind-blowing juxtaposition.
Aside from the timing exploring, it will take you some time to get there! Carnarvon National Park is about an 8-hour drive from Brisbane.

Treats at Goomeri Bakery
We drove up from the Sunshine Coast, taking the trip through Roma on the way there – making an essential stop for treats and coffee at Goomeri Bakery – and looped back via Rolleston to the north for a change of scenery. The journey was half the fun and we stopped for a hot lunch and a game of pool at the quirky Hotel Cracow on our way home.

The start of our 2-day hike
Here are our 8-must-see adventures on your visit to Carnarvon National Park:
1. The Moss Garden
Most of the highlights in the gorge are side-trails that generally require some up-hill or stairs. Given we had our packs to camp at Big Bend before walking back out the next day, we left them at the turn off to save some energy and appreciate as much as we could. The main walk is just shy of 20km if you don’t do any of the side trails – which would be a mistake in our opinion!

Entering the Moss Garden
The Moss Garden is the first side trail off to the left as you walk along the Canarvon Great Walk. You walk up a decent staircase to get there but about halfway up you can feel the temperature drop and the air becomes fresher.
When you get to the top, it is incredibly lush and green with loads of fern trees and a boardwalk right up to a small waterfall. You can see the moss on the rocks that gives this area its name.
2. The Amphitheatre
This was our second stop on day one, and it was probably my favourite. It is here, after heading through a deep gash in the gorge, that you will get the best views of the signature towering sandstone cliffs.
Stairs to the Amphitheatre
You will head up a steep but safe staircase but the climb is worth it, as you’ll be standing beneath 60-metre yellow sandstone walls, two million years in the making. There are some seats at the top where you can sit and really soak in the wonder.

Looking up in the Amphitheatre
3. The Art Gallery
A place steeped in history. There are more than 2000 engravings, ochre stencils and freehand paintings decorating the 62m-long sandstone walls of the Art Gallery. A site of deep cultural significance to Indigenous people, the local Bidjara and Karingal groups. You can learn about the meaning of the art as you walk along the boardwalk that runs along with it.

The Art Gallery
4. Camping overnight at Big Bend
Another highlight of this adventure. There are only 10 campsites at Big Bend so you will need to book in advance to make sure you get a spot. This also means there won’t be many people around when the sun sets! There were only six of the sites occupied when we stayed, and it was magical.

Our campsite at Big Bend
Big Bend is at the end of the main gorge walking track and most day-hikers turn around before they even make it there. We almost got lost after the main track ended on our way here – so you need to keep a keen eye out for the small orange markers on rocks highlighting the way to go.
There is a natural (very cold) waterhole with beautiful sandstone walls which was the perfect spot to wash off the day’s work and refresh our muscles.

A refreshing dip at Big Bend
There is a toilet at the campground and a picnic table which was nice as we hadn’t carried any chairs with us – the tent and water was heavy enough!
It’s actually the first camping area for those doing the 5-day Carnarvon Great Walk and we had a good chat with some through-hikers – maybe that will be another adventure!
5. Ward’s Canyon
Ward’s Canyon was our first detour on the walk out with fresh legs. A short flight of steps takes you 200m up into a little side gorge, where a small waterfall trickles down the rock wall.
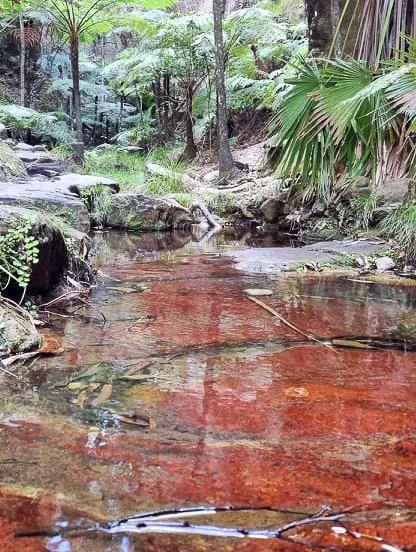
Walking into Ward’s Canyon
Along with being one of the few places you can see the world’s largest fern, the king fern Angiopteris evecta, you’ll notice a rusty tinge in the water as you make your way into the cool gorge. This amazing hue is red algae.
6. Boolimba Bluff
This short hike is not for the faint of heart! We tackled this the day after our overnight camping trip, but the effort was worth the reward!
We had heard the best time to see the views from the top of the bluff was at sunrise so we got up at 4am, grabbed our head torches and headed back into the gorge in the dark and I am so glad we did.

Sunrise at Boolimba Bluff
The Boolimba Bluff just briefly starts on the main gorge track, but quickly detours into an extreme number of stairs which never seem to end – there is even a sign telling you there is a steep ascent ahead but don’t let that deter you. The views are amazing at 200 metres above the gorge floor, but we recommend you dress warmly as you wait for the sun to come up.
It was great to do this 7km return trip after our adventure in the gorge as it gives you an amazing perspective on where you hiked before.
7. Mickey Creek Gorge & Warrumbah Bluff
Well outside the gorge itself, there are still incredible sights to see. The day before heading on our overnight hike, we biked around and headed into Mickey Creek and Warrumbah Bluff.
It starts off as a level path leading through the bush, then it is not long before the track narrows and becomes steeper, at times climbing up the creek bank and then crossing to the other side.
There’s a well-worn path beyond it, following the creek further into the bush – we could only go so far without submerging our feet.
After heading up to Mickey Creek, do yourself a favour and take the fork in the road down the track to Warrumbah Creek Gorge.

Warrumbah Creek Gorge
You will find more of a scramble than a hike but walking over moss covered rocks and climbing makeshift log ladders just adds to the sense of adventure as you go deeper into a narrowing gorge. This was one of my favourite experiences of the trip.
8. A swim in the Rock Pools
There are only a couple of places you can swim in the National Park and the Rock Pools is one of them.
A short 400m walk (over rocks so wear shoes!) will take you to a deep pool that is the perfect spot to cool off in after biking and hiking.

Swimming at the Rocks Pools
You will need to be prepared for this water to be ICY.
Bonus tip: After hiking up Boolimba Bluff first thing in the morning, we decided to give our legs a rest but still wanted to see more. We managed to get a last-minute afternoon spot on a 20-minute scenic helicopter flight over the gorge and it was the best idea ever!
The helicopter doesn’t actually fly over Carnarvon Gorge itself (not allowed by Parks and Wildlife) but seeing the surrounding landscapes was incredible.

Our friendly pilot pointed out various rock formations including the Magnificent Three Sisters and deep narrow gorges filled with tropical plants before heading back to land in the blink of an eye.
Where to stay: We stayed at Takarakka Bush Resort (now known as BIG4 Breeze Holiday Parks Carnarvon Gorge), camping in a larger tent and leaving it all set up while we walked with our light-weight hiking tent into the gorge.

Our campsite at Takarakka
The resort is about 3km from the entry to the Great Walk and has all the amenities you could want. There are also plenty of kitchen and BBQ shelters available so you don’t need to travel with all your cooking gear and it is nice to meet up with people preparing meals and sitting around a campfire.
There is also a creek that runs behind the resort. Apparently you might be able to spot a platypus here but we weren’t that lucky but we did manage to get a refreshing dip at the ‘beach’ end far from where the elusive creatures call home.

Swimming in the creek behind Takarakka
The hot showers are welcome on tired legs after days in the gorge too.
There is also a short walk from the camp grounds up to a lookout that is great for sunset. Take a drink and soak in the serenity!

Sunset at Takarakka
On our last night, we even headed to the Bush Bar for a pre-booked communal roast dinner which capped of a great escape. Not sure if they still do this now it has converted to a BIG4.
Best time to visit: Summer would be a no-go! Aside from the heat, the Gorge itself floods during the wet season and can be closed. We went in mid-September and the daytime temperatures were in the 30s and the nights were cool.

A solo summit of Ben Nevis, Scotland
Hiking to the top of the highest mountain in Britain in one day? Sure, why not! Do it alone, even more of a challenge!
Spending a week solo in Scotland, I wanted to get some hiking of that epic scenery under my belt. As I travelled around and mentioned to locals that I was planning on heading up Ben Nevis – alone – they seemed determined to persuade me it was a bad idea. Nevertheless, I was determined.
The main concern is that for most of the year, the peak isn’t even visible from the ground and the people have literally just walked off the edge because the visibility was so bad.
I lucked out though. For my entire week in Scotland, the sun was shining, and skies were clear – perfect September conditions.

By world standards, Ben Nevis isn’t that imposing. Standing at just 1,345 metres (4,409 ft), the mountain would be dwarfed by many but that doesn’t make it any less work.
One of those reasons is that you start the hike pretty much at sea level and you have to go up and down in one day. Even with perfect conditions, the blustery wind at the top means you don’t want to stick around too long.
Guides estimate that it takes between 7 and 9 hours to complete the 18km round trip. My advice, hit somewhere in the middle, the down portion at the top is nowhere as easy as I imagined it would be.
I was staying nearby in Ballachulish but still got up before brekkie was served and headed for the starting off point near Fort William.
Find your perfect Scottish stay here.

There were a few people around the start of the hike which was great so I didn’t feel all alone. The walk itself start off relatively easily along a pony trail among lush green farmland. The air was misty but as the path ascended, the mist cleared and there were plenty of reasons to stop, take in the views and take photos.

About 90 minutes into the hike, the trail passed Lochan Meall an t-Suidhe (also known as the ‘Halfway Lochan’). The water here is so pure that a one of the oldest licensed distilleries in Scotland – Ben Nevis - source water for their Scotch from two lochans situated 3,000 feet up the north face of the mountain.
Several hours into the hike, the path becomes increasingly stony and you definitely have to watch your footing. Near here you also cross a small waterfall which I imagine after snow or melting snow is not so small at all!
As I climbed it became ever colder, luckily I was well prepared with several layers. The path for the last hour isn't really a path… it's more like a convenient rockslide!

The last stretch to the summit really is the hardest and I can see why in bad weather this is not a great hike. I had perfect conditions and could only just see the trail as a slightly different colour of the rock.
The views during the trek were sensational and between these and the walking you couldn't help but be left breathless.
When you do reach the top. it seems as if half of Scotland is spread before on a clear day – from the mountains of Skye in the northwest to the Cairngorms in the east.

The top of the mountain is relatively flat with cairns (piles of rocks) marking the way across and away from the very steep cliffs below. Peering over some of the edges, there were even remnants of snowbanks at the end of September! You really would need to be mindful of weather changes up here.

I stopped at the top for about 20 minutes for a snack and some photos. It was way too cold to sit still for too long.
The first part of the descent was actually harder than going up in my opinion. The rocky scree and decline meant that I felt like I was squatting for about an hour!
The change from rock to path was a welcome one and I think I trotted the last hour back to my car.
I highly recommend a good pair of hiking boots for this day hike and the right layers for the conditions as it can quickly change. I am so glad I managed this hike, even if I couldn’t walk properly for a day afterwards!
Before heading back to my hotel for a hot bath I stopped in for a beer in Fort William and something warm to eat. It is a small but very welcoming Scottish town and I wish I could have stayed a bit longer.


Millennium Cave Trek, Vanuatu
Espiritu Santo may be the largest island in Vanuatu but it is definitely still off the beaten track.
Hidden up behind the town of Luganville and away from the aquamarine blue water along the coast are small villages in the hills. This is where we will be heading on our Millennium Cave tour.
You can’t do this trek without the local guides but we saw this as a good thing.

Walking into Vunaspef village
We met Sam at the ‘office’ in Luganville before setting off on our big adventure. His dad is the chief of the village that owns the land the cave is on, and the money goes directly back into their community. Already it has funded schools and training for the locals.
The day starts will a slow drive up to Nambel village, along a wide, pothole-filled dirt track that was once the biggest air strip on the island, built by the Americans during WWII. While you may have to brace yourself for some bumps, this will probably be one of the easiest parts of the day!
For the rest of the day we will be trekking, caving, canyoning and swimming.

Crossing a bamboo bridge.
Aiden and I were lucky enough to be travelling on our own with two local guides who know this land really well. The first ‘trek’ is a 20-minute stroll through the lush green jungle to Vunaspef village where you will be briefed by your tour guide and given a life jacket – not the most comfortable accessory to have in the humidity, but a necessary piece of equipment.
If you have anything you want to keep dry, leave it here to collect on your return! We had a dry bag with us for the essentials and our lunch.
From here on out, this trek is no walk in the park and you will need some degree of fitness to make it out. The ground was muddy and slippery even though it hadn’t rained in days, and soon the grooves in my water shoes designed to provide grip were soon caked with mud. The core was definitely engaged.
We walked along narrow tracks, across bamboo bridges and up and down ladders with slippery handles until we got to a rest point before the descent to the river. Along the way, our guides pointed out different plants and had interesting stories to tell.

The different lines symbolise different elements in nature.
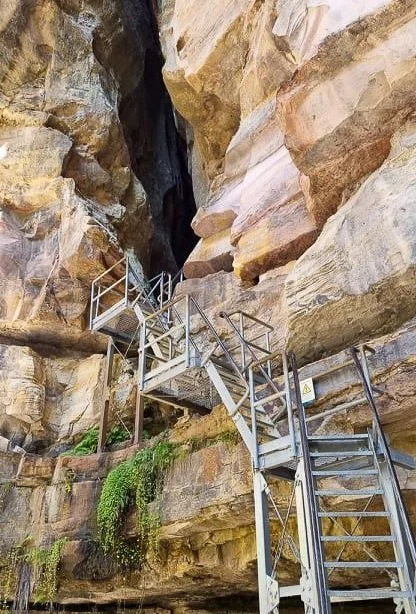
At a clearing, we paused for a symbolic ritual: clay paste applied to our faces to mark our respect for nature and ensure safe passage. The next section involved steep ladders so I hope you aren’t afraid if heights, because you have to look down to make sure you don’t miss a step.

The entrance to the Millennium Cave
Eventually you look up and see the entrance to the cave itself – which is immense.
The cave has a high ceiling and is home to many nesting swallows and some bats, which you see by torchlight as you walk through. The river runs the entire way through the cave and is cool and refreshing as you climb over rocks and wade through the cavern.
The size of the cave means that for most of the trip through, it is pitch black. We stopped at a waterfall in the middle and all turned our torches off to truly experience the extreme darkness.

The exit to the cave in sight!
It takes at least 30 minutes to get through the cave, especially slow going when the ground is a riverbed, covered in rocks of different sizes and flowing water sometimes up to my thighs. I will admit I stumbled twice on this section of the trek but with no injuries other than a slightly bruised knee and ego.

A scenic and secluded lunch spot
You can see the natural light from a distance but the exit to the cave is much smaller than the entry. The final stretch from the cave is to cross the river with the aid of a rope as it is quite deep and fast flowing in the centre. After all that effort, the bank of the Sarakata River is a rest stop for lunch and you definitely have it all to yourself.
From here is was the canyoning portion of the day – although not in the true sense. There were no harnesses and no helmets. Just a few J-bars secured to the rocks to help you up, down and over.
Some sections had a strong current as the river was near some small waterfalls so indeed there was no shortage of hazards here. In fact, I would say this section of the tour was perhaps the most treacherous part, and we really had to pay attention to our guides as well as concentrate on where we were placing our hands and feet. The whole body was getting a workout on this adventure.
I was excited for the next step – the most relaxing and the obvious reason for our life jackets. We spent the next 20-30 minutes floating down the river, past some epic waterfalls, looking up the overhanging rock faces.
Unfortunately, what goes down must go back up, so there is some hard work to do to make it back to the villages.
We climbed up a small, slow-flowing water that seemed tailor-made with hand and footholds before finding some more of those almost vertical ladders to take us higher. It is about 20-minutes of just moving ‘up’. I was feeling the workout at this point, especially with the extra weight of wet clothes and a life jacket to carry.

One of many ladders climbed on the day.
Once back at Vunaspef village, we enjoyed some of the freshest fruit- literally picked by our guides on the walk - and some coffee before walking back to Nambel village for the pickup that took us all the way back to your accommodation.
This has to be one of the most epic treks I have done with so many different aspects. I also couldn’t bend my legs properly for a day or two afterwards – swimming in those blue waters helped though.
See for yourself and book accommodtion here.

The view on the walk back to the village.